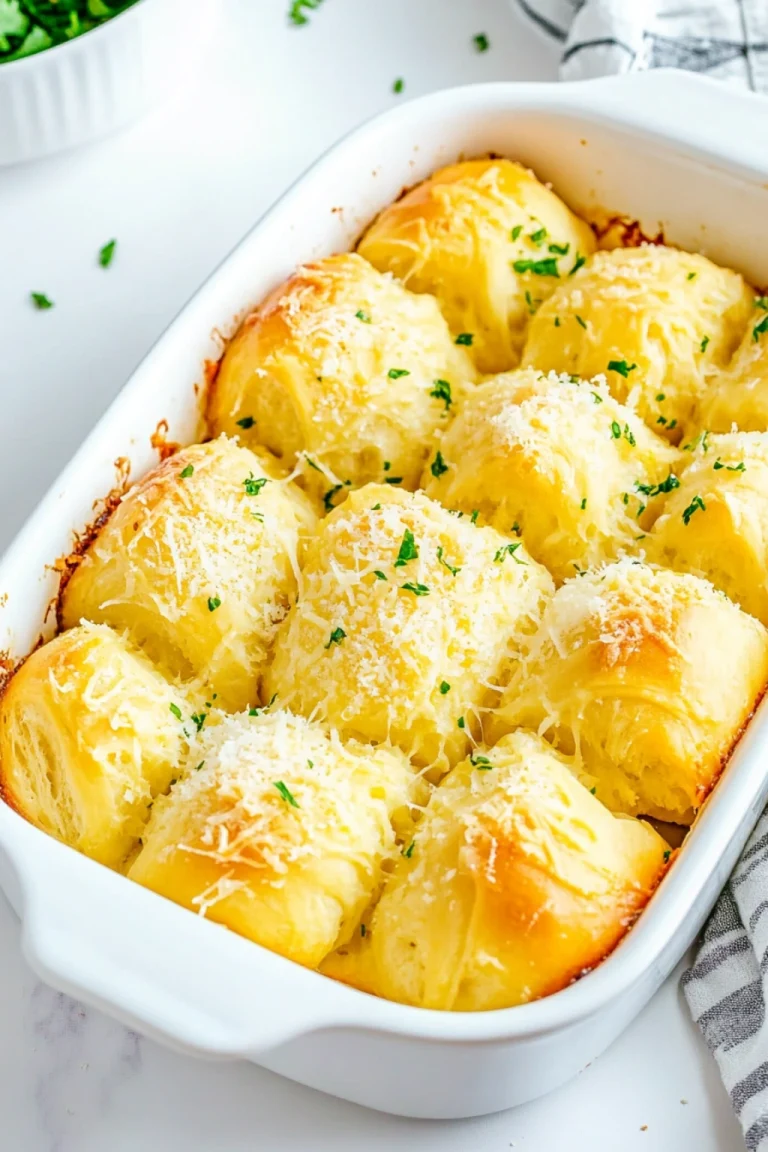
These easy Cheesy Breadsticks are the make-ahead upcoming family gathering or party appetizer of your dreams! Bread, cheese twists make everyone happy especially my child!The crispy Breadsticks of cheese on the bottom with flaky layers are the best and ide dish or snack !
I prepared one dough round, then divide it in half. I used one half of the dough Cheesy Breadsticks. Bake until golden and you have a side that majorly competes with the main dish.The other half of the dough was used in a pizza recip.

These breadsticks have become our go to choice because they are perfect for movie nights and lazy weekends and those oops we forgot to plan dinner days.
They are soft on the inside while they are a little crisp on the edges and they are loaded with cheesy goodness so it feels like a total win and that is no joke.

I will admit it because I burned the bottom once and maybe twice since I got distracted but life happens however even then they were still good and they were still eaten so there were no leftovers ever.
Kitchen Equipment Needed :
Before you start, it helps to gather all your kitchen tools. This makes cooking easier and more fun :
- Baking sheet or tray
- Parchment paper or non-stick spray
- Rolling pin or a clean bottle if you do not have one
- Mixing bowl
- Pastry brush or spoon
- Knife or pizza cutter
- Oven mitts
Having everything ready means you do not have to stop in the middle of cooking to search for tools.
Tips for Cheesy Breadsticks
– For a shortcut, you can use ready-made garlic butter instead of plain butter and garlic powder. This adds instant flavor without extra steps. You can also bake the breadsticks on the middle rack of the oven to prevent burning.
– Another tip is to shred your own cheese instead of using pre-shredded cheese. Freshly shredded cheese melts better and makes the breadsticks stretchier. If you want extra flavor, mix a little Parmesan cheese into the mozzarella.

– One helpful tip is to use store-bought pizza dough if you are short on time. It saves effort and still tastes great. If the dough is cold from the fridge, let it sit at room temperature for 10 minutes so it is easier to roll.
What to Eat with Cheesy Breadsticks ??
These cheesy breadsticks fit into just about any meal in our house. I usually serve them warm alongside soup so everyone can pull, dip, and enjoy every cheesy bite.
They’re also great as a snack with marinara, ranch, or even a simple garlic butter for dipping. On busy days, I’ll add them to call it dinner, and when friends come over, they disappear fast as an appetizer. My kids love them straight from the oven, and I won’t lie I do too.
Ingredients :
Here is a simple list of ingredients that are easy to find in most kitchens or grocery stores :
- 1 package pizza dough “homemade”
- 1 to 1½ cups shredded mozzarella cheese
- ¼ cup shredded cheddar cheese
- 2 tablespoons melted butter or olive oil
- 1 teaspoon garlic powder
- 1 teaspoon dried oregano or Italian seasoning
- ¼ teaspoon salt
Optional toppings : grated Parmesan cheese, chili flakes, or fresh parsley
These ingredients work together to make breadsticks that are cheesy, soft, and flavorful. Mozzarella is the main cheese because it melts well and becomes stretchy. Cheddar adds a little sharp taste, but you can skip it if you want a milder flavor.
How to Make Cheesy Breadsticks :
Step 1
First, preheat your oven to 200°C (400°F). This helps the breadsticks bake evenly and become golden. Line a baking sheet with parchment paper or lightly grease it so the dough does not stick.

Step 2
Next, place the pizza dough on a clean surface. Use a rolling pin to gently roll it into a rectangle. Do not worry if it is not perfect. The dough should be about ½ inch thick so the breadsticks stay soft inside.

Step 3
After that, transfer the rolled dough onto your baking sheet. Brush the top with melted butter or olive oil. This step is important because it helps the top turn golden and adds flavor. Sprinkle the garlic powder, salt, and dried oregano evenly over the dough.
Step 4
Now comes the best part : the cheese. Spread the shredded mozzarella evenly over the dough. Add the cheddar cheese if you are using it. Try to cover the surface so every bite has cheese. If you like extra cheesy breadsticks, you can add a little more cheese on top.
Step 5
Place the baking sheet in the oven and bake for 12 to 15 minutes. Watch closely during the last few minutes. You want the cheese to be melted and bubbly, and the edges to turn light golden brown. When done, remove the tray from the oven using oven mitts.

Step 6
Let the breadsticks cool for about 2 minutes. Then use a knife or pizza cutter to slice the dough into long strips. Serve warm for the best taste and texture.
FAQ’S :
What cheese melts best for breadsticks ?
Mozzarella melts best and gives the stretchy texture people love.
Can I make cheesy breadsticks without garlic ?
Yes, you can skip garlic if you prefer a plain cheesy flavor.
Can I add herbs on top ?
Yes, dried oregano, basil, or Italian seasoning work great.
Can I freeze cheesy breadsticks ?
Yes, freeze them after baking and cooling. Reheat in the oven when ready to eat.
SAVE THIS POST TO YOUR FAVORITE PINTEREST BOARD !


Easy Crack Breakfast Casserole
Course: Breakfast, BrunchCuisine: American, FrenchDifficulty: Easy8
servings15
minutes40
minutes420
kcal55
minutesCrack Breakfast Casserole is a cheesy, hearty breakfast made with eggs, potatoes, sausage, and melted cheese, all baked together in one dish for an easy and comforting meal.
Ingredients
1 pound breakfast sausage or bacon
4 cups frozen hash browns shredded or diced
2 cups shredded cheddar cheese
1 cup shredded mozzarella or Colby jack cheese
8 large eggs
1½ cups milk
1 teaspoon salt
½ teaspoon black pepper
1 teaspoon garlic powder
1 teaspoon onion powder
optional but recommended :
½ cup cooked and crumbled beef
Chopped green onions or parsley for topping
Directions
- First things first preheating your oven to 375°F (190°C). Lightly grease a large baking dish so nothing sticks later. This step makes cleanup much easier.
- Next, cook the breakfast sausage or bacon in a skillet over medium heat until it’s fully cooked and nicely browned. If there’s extra grease, carefully drain it off. This helps keep the casserole from becoming too oily.
- Proceed by spread the frozen hash browns evenly across the bottom of the prepared baking dish. Sprinkle the cooked sausage or bacon over the potatoes, making sure it’s evenly distributed. Then add both types of shredded cheese, covering everything in a thick, cheesy layer.
- From here in a large mixing bowl, crack the eggs and whisk them together with the milk, salt, pepper, garlic powder, and onion powder. Whisk until everything looks smooth and well combined. Slowly pour this egg mixture over the ingredients in the baking dish. Gently press down with a spoon so the liquid reaches all layers.
- As well place the dish in the oven and bake for about 40–45 minutes. The casserole is ready when the center is set and the top is golden and slightly bubbly. If it starts browning too fast, loosely cover it with foil.
- Favorite go-to once baked, remove it from the oven and let it rest for about 5–10 minutes. This helps it set and makes slicing easier. Sprinkle with green onions or parsley if you like, then serve warm.
Notes
- Preheat your pan or popper maker and ensures even cooking and golden edges from the start.
- Fill molds halfway batter will rise overfilling can cause overflow.
- Don’t overmix the batter : overmixing leads to dense, chewy poppers instead of fluffy ones.
- Check doneness early : poppers cook faster than regular pancakes.
- Freezer friendly you can freeze fully cooled poppers for quick breakfasts.
- Customize flavors and add cinnamon, vanilla, or lemon zest for variety.